Split layouts into subfolders in Android Studio

TL;DR: You can manage your resources XML files (layout, drawable,..) better, by grouping them into separate subfolders corresponding to app’s features.
Today when optimizing the codebase of my school project, I saw this:

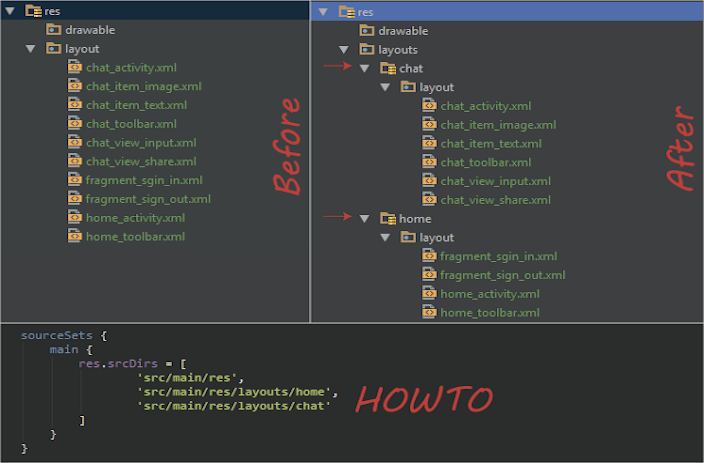
Look at the list of XML files inside my res/layout folder.
Horrible, right?
Now, look at yours. Is your res/layout too big, hard to control? Your project has too many features, too many screens? Let imagine while confusing running for the deadline, and you can’t find the XML layout that needs to be fixed just because you cannot remember the file name!
Wandering search online, I find out that many developers have the same problem. So I decided to write an article to share some tips about how to manage the resources folder in Android Studio.
Step 1: create layouts container
Create a parent folder that contains all the layouts of our project.
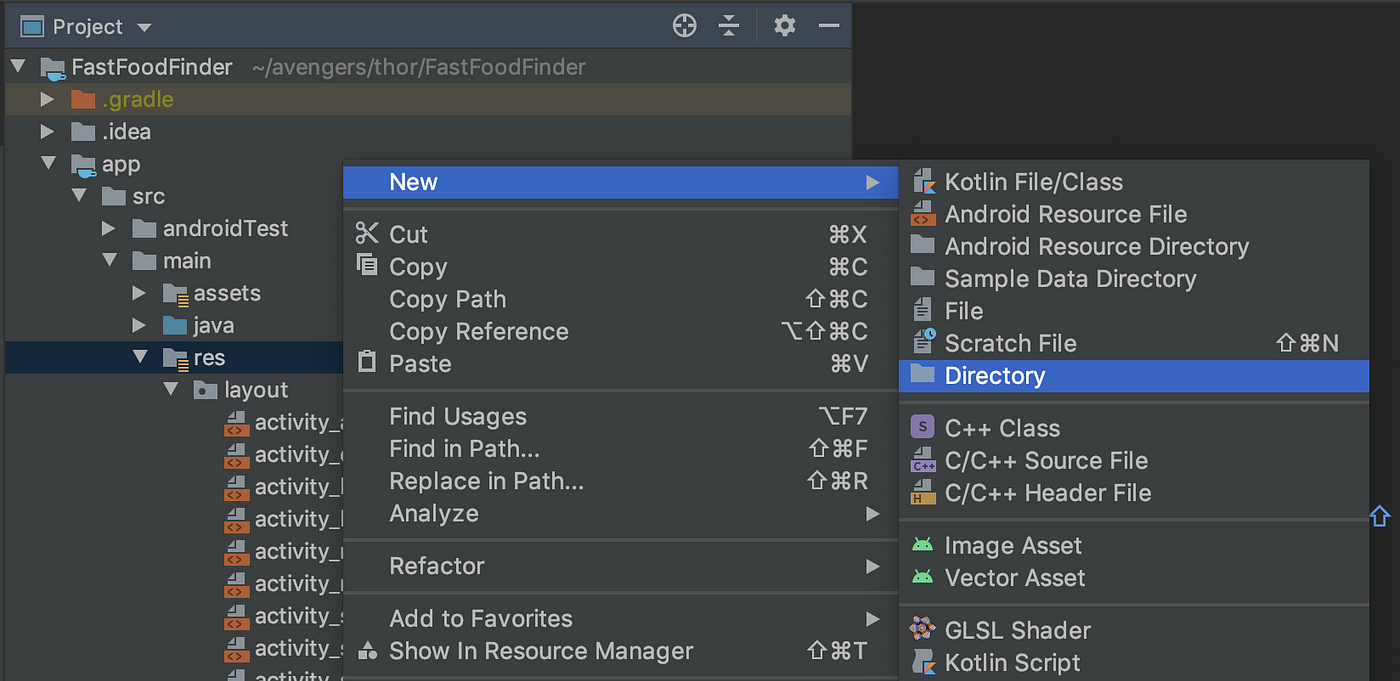
Switch project tree explorer to Project view. Right-click in res, select New → Directory, type layouts(remember the ‘s’ or it will be duplicated).
This step is a must-have at the moment. When changing the project tree to Android view, you cannot see the separated subfolders. They are actually NOT merged into one, but Android Studio shows them in the same folder.
Step 2: create feature Res Folders
Select layouts, right-click and select New → Folder → Res Folder. This resource folder will represent a “feature category” that you want.
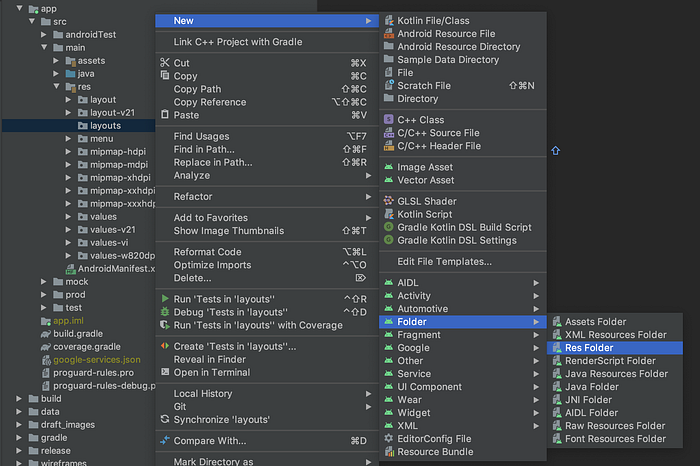
If you have N vertical features, you need to create N folders. For example, you are developing a Chat app that has 3 categories “home”, “profile” and “chat” corresponding to vertical groups of features.
First, I will add chat as new Res Folder, wait a while for Gradle syncing to re-structure the codebase. After that, you will see a yellow chat folder in the res but not inside the layouts. Actually it’s still in layouts, however, because we’ve just added only one folder chat so it only shows chat. Continue to create two more Res Folder for home & profile. Then the project tree will appear exactly as what you expect:
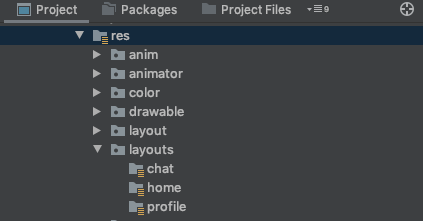
'chat’, 'home’ & 'profile’ are now inside layouts.At this point, you’ve successfully divided the layouts into 3 separate categories.
Step 3: Add resources to each subfolder
Add a layout folder (without ‘s’) to each subfolder corresponding to each category — like the traditional res/layout. Now you can add any XML layout file that belongs to the current feature into that layout folder.
You can also add other types of resources: menu, drawable, anim,..
Step 4: Resync
Try re-sync Gradle and rebuild the project, you will see the following code was added inside the android tag of app/build.gradle file.
This code corresponds to adding 3 categories: 3 resource folder chat, home & profile. If it does not exist, you can add it manually.
Access the resources
After resync, you can access these resources normally in Java/Kotlin code using R.layout.chat_activity.xml, R.drawable.chat_send_button.xml,… Whenever you need to find any XML file, just go to the subfolder of that feature to look for it!
Other solutions?
Another way is to modularize your project: moving code and resources into a separate feature module. It’s much cleaner and follows SRP principle.
In Conclusion
You can organize your resources XML files (layout, drawable,..) into separate subfolders corresponding to the app’s features.
I hope these tips above will help you manage your project better, saving your precious time — especially when you need to maintain a huge codebase with many vertical groups of features.
Programming is a process of creating products with the team, so code style & project organization are very important. And such things are usually not taught in school.
Happy coding~

